Showing posts with label later recipes. Show all posts

Sunday, July 3, 2011

Miracle Blondies

The story behind these blondies is not about making the blondies themselves, but what led up to their creation.

On Wednesday night, I received an e-mail from a friend asking if I and a couple other friends could put together a Sabbath meal for Saturday lunch. I quickly volunteered my apartment and said I would make a dessert and the main course. The only restriction was "no chocolate" as one of my guests couldn't eat it. That's a restriction that cancelled out a lot of my go-to desserts, but I had a plan.

I recently bought a copy of David Lebovitz's Ready for Dessert, which has a great collection of recipes. One of them is a Fresh Ginger Cake which has the benefit of being completely butter-free. I've made a ginger cake using only fresh ginger before from Joy of Cooking, but this is on a completely different level. How? Well...this one uses molasses! That's classy, right?

Anyway, I had all of the ingredients on hand except for the ginger. Friday morning, I went out to the Trader Joe's and picked some up to use later. Unfortunately, in my early morning barely-conscious haze, I neglected to check the quality of the ginger. And so it was, at 5:00 pm on Friday as I joyfully began to prepare making my ginger cake, I discovered that the ginger was moldy.

Oops.

In retrospect, the best thing to have done at this point would have been to walk down to the Safeway (about 2 minutes away), pick up some more ginger, then come back. Instead, I panicked. It's one of my great failings that I don't deal well when my plans go awry. For the next 20 minutes I rummaged through every dessert cookbook available to find a recipe I could make. Eventually, I settled on making a pie with the blackberries and blueberries I purchased in the morning. The problem here was 1) making a pie dough quickly, and 2) making it dairy-free. The obvious answer was to use shortening, but I only had a limited amount.

I turned to my favorite emergency baking resource, Ratio by Michael Ruhlman. In his book, he provides a ratio for pie dough - 3 parts flour:2 parts fat:1 part water (all by weight). Simple enough, right? I threw some shortening into the freezer to chill, then went over the recipe to see if there was anything I was missing. Suddenly, I realized that I would need to blind bake the crust, which meant I needed dried beans. I racked my brain for a moment, trying to think if there were any dried beans in the apartment, then recalled I had a bag of lentils. Somewhere. I checked the pantry. No lentils. I checked the random shopping bags in my kitchen. Still no lentils. I spent the next 15 minutes tearing up the apartment before I found the lentils...in my bedroom closet. Yeah, I don't know either.

Having recovered the lentils, I removed the shortening from the freezer and hacked at it with a paring knife. Whirling in place, I grabbed a bowl near the sink, put it on the scale and haphazardly poured out some flour. I added the shortening, then put on a pair of latex gloves and started rubbing the fat into the flour.

Next, I needed to add some ice water until the dough came together. Lacking ice cubes (yeah, don't ask) I resorted to the Brita pitcher in the fridge. I gradually poured in an ounce of water and mixed it together with my hands. It came together, but I had some doubts. By weight, I should have needed more water, but the dough in front of me didn't seem to need any. Stupidly, I added more water anyway, resulting in a dough that was way too wet. I tossed in a bit more flour and shortening, and tried to rescue it.

Then, I realized I forgot to put in the salt. Rather than do the intelligent thing of measuring it out, I opened up the container and kind of shook it at the bowl. The result was a stream of salt going into the bowl, far more than the pinch or two I needed. Resigned to the fact that the dough was no longer salvageable, I tossed it in the garbage. The time was now 5:45 pm.

At this point, I was about to say "screw it," and make brownies, a very straightforward recipe that could be assembled in a brief period of time. In fact, if you follow me on Twitter (@TalkingTV), you'd know that I even said "Screw it, I'm making brownies." But I couldn't do it. Remember, I had a guest that couldn't eat chocolate. As someone who has a very long list of food sensitivities, I couldn't knowingly make something that one person couldn't eat. Especially when that person has done a lot to cater to my problems in the past. So brownies went out the window.

Finally, I came across a recipe for blondies in a copy of Baking Illustrated that I checked out from the library last week. The only chocolate involved was chocolate chips, which I figured I'd just leave out in part of the batter. Since the original recipe called for a 9x13 pan, I decided to use two 8x8 pans. One pan would contain no chocolate chips, the other would have some stirred in. It was 6:00 pm.

I was up against the clock. I quickly shoved everything around the counter to clear some space, and grabbed some margarine from the fridge. I portioned out what I needed, threw it in a small saucepan, and set it on medium heat. It melted quickly, but started to bubble, so I lowered the heat slightly. Using the paring knife, I tried to cut the margarine into smaller pieces as it melted, with only some degree of success.

Once melted, I poured the margarine into a large bowl, then glided across the kitchen to get the brown sugar from the pantry. Yes, you read that right. I glided. Flour and sugar had accumulated on the floor during my frantic tossing and mixing, so my traction was significantly reduced. I was supposed to pack the brown sugar into measuring cups, but I was so caught up in the frenzy that I ended up just grabbing handfuls of the sugar, squeezing it tightly, then dropping it into the bowl. Thank goodness there was a weight measurement too, or it would have been the fourth disaster of the day. Quickly, I whisked the sugar and margarine together, and perched the bowl on top of some other kitchen detritus.

Next, I whisked the dry ingredients in a small bowl, taking my time to measure out the salt. I found some space on a small table in the kitchen and put the bowl down. Turning back to the sugar/margarine mixture, I tossed in two eggs and vanilla and whisked them in. Finally, I gradually added the dry ingredients to the batter and folded until just combined.
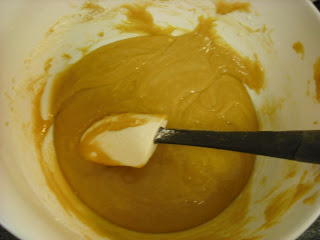
I was incredibly nervous at this point because the amount of batter was so...low. I couldn't fathom how it could normally fill a 13x9 pan, let alone my 8x8 pans. But it was too late. I finally had a dessert that was going reasonably well and I couldn't give up. I scooped half the batter into a lightly greased pan and tried to smooth it out with the spatula. (Incidentally, the recipe says to make a foil sling for the pan. I was too tired at this point to deal with it.) Then, I measured out a reasonable amount of chocolate chips for the remaining batter. OK, fine, I grabbed the nearest bag of chocolate chips and just started pouring directly into the bowl until it kind of looked right. That dough went into the second pan, and both went into the oven at 6:15.

I carefully monitored both pans, concerned that the change in volume would affect the baking time. The recipe says to remove the bars when the tops are "shiny and cracked and feels firm to the touch." After 25 minutes of baking, it didn't look like the first two conditions would be met anytime soon, so I poked the cakes a bit before deciding to remove them. I dropped them onto the cooling rack and gave them the once over.

They didn't look too bad, actually. But my confidence was so shattered after all the prior failures that I gave them a 60% chance of being edible and a subsequent 30% chance of being tasty. But I frankly didn't care anymore. They were done, they were decent, and I could move on with other things I needed to do.

By the way, I did realize later why the volume of dough seemed less than expected. I had left out the cup of chocolate chips and cup of pecans which would have significantly increased the total volume. But I don't like pecans in my desserts (except for pie) and the chocolate chips were added later in the process. It was a relief to figure out that I wasn't crazy. Or, at least, not that crazy.

The moment of truth came the next day at the meal when I served the blondies to three friends and two guests that came at the last minute. I cut out pieces from both pans and handed them to my guests. I anxiously studied their faces as they bit into the blondies, chewed, and swallowed. I held my breath as I waited for someone to render the first judgment. Finally, it came.

Tasty!

What?!?! I had managed to pull it off?!?! I grabbed a piece of the blondies for myself and tried them. They were, in fact, very good. A little denser than I usually like, but considering everything that led up to them, I wasn't complaining. My friends stuck around for a few more hours and together we kept taking more of the blondies. By the end of the day, both pans were almost completely empty.

Because the end result came out so well despite so many setbacks, I've decided to call these blondies "Miracle Blondies." It may not be a miracle of biblical proportions to have a piece of cake come out well, but when my friends didn't spit it out and instead reached for seconds, I certainly whispered thanks to God for having my back.

Maybe He likes blondies too.
-----------------------------------------------------------------------------
"Miracle Blondies" (Adapted from Baking Illustrated)

INGREDIENTS
  • 1 1/2 cups (7.5 oz) unbleached all-purpose flour
  • 1 teaspoon baking powder
  • 1/2 teaspoon salt
  • 12 tablespoons (1 1/2 sticks) unsalted butter (or margarine), melted and cooled
  • 1 1/2 cups (10.5 oz) light brown sugar
  • 2 large eggs
  • 1 1/2 teaspoons vanilla extract
  • 1/2 cup semisweet chocolate chips
  • 1/2 cup white chocolate chips (I don't like white chocolate, so I just used more semisweet chocolate chips)
  • 1 cup pecans, toasted and chopped coarse (optional)
INSTRUCTIONS

1) Adjust an oven rack to middle position and heat the oven to 350 degrees. Spray a 13x9 inch pan with nonstick cooking spray. Make a foil sling by placing two sheets of foil or parchment paper in the pan perpendicular to each other and greasing both sheets. (I find the sling optional, but that's up to you.)

2) Whisk flour, baking powder, and salt in a medium bowl. Set aside.

3) Whisk melted butter/margarine and brown sugar together in a medium bowl until combined. Add eggs and vanilla and mix well.

4) Using a rubber spatula, fold the dry ingredients into the wet ingredients until just combined. Do not overmix.

5) Fold in the chocolate chips and nuts and turn the batter into the prepared pan. Smooth the top with a rubber spatula.

6) Bake until the top is shiny and cracked and firm to the touch (the latter is the most important one), 22 to 25 minutes. Cool completely on a wire rack, then (if using a foil sling), remove the bars from the pan and transfer to a cutting board.

7) Cut into 1 1/2 x 2 inch bars and serve.

Monday, May 16, 2011

Chocolate Pasta: Take 1

Here's the problem with making chocolate pasta. It looks disgusting. Squid ink pasta, which I've seen on TV, is a really cool looking black pasta. That's what I thought chocolate pasta could look like. Unfortunately, chocolate is more brown than black, so almost every picture I'm going to put in this post will probably look...well, gross. But I promise it tasted good.

Why chocolate pasta? Last week, I completed my second-to-last semester of my Master's program. To kick off my temporary freedom, I thought I'd try my hand at chocolate pasta, a recipe that looked really awesome and totally bizarre. I can't remember when or how I came across the recipe, but once I read it, I knew it had to be done. The only question was a matter of time. Making the pasta isn't a labor intensive process, but when the heck was I going to eat an entire plate of chocolate pasta? Thankfully, a bunch of friends were coming to over to my place on Sunday for dinner, so it was the perfect time to try it out and get some feedback.

My friends planned to arrive around 7:15, so I began the process around 5:30 to allow time for rolling and cutting. The recipe uses a food processor to mix everything together, but mine only has a 2-cup capacity, and I was concerned about the processor overflowing. I decided to make the pasta in two batches, doing half the recipe in the processor at a time. I began by putting the flour, egg, cocoa, and powdered sugar into the processor. Then, I measured out the 30 grams of chocolate and put it in the microwave. 30 grams of chocolate is a lot smaller than I expected it to be. I melted the chocolate most of the way, stirred it around a bit, then spooned it into the processor. I closed the lid, pushed the button, and waited for the magic.

Except...nothing happened. I kept pressing the button, but nothing in the bowl moved. I heard a whirring sound each time, which led to further confusion. Finally, I realized I had completely forgotten to put the blade in the processor. This presented a bit of a dilemma. Should I: 1) try to squish the blade through everything and hope I don't make a huge mess; or 2) dump everything out of the bowl, put the blade inside, then put the ingredients back in. If you've read any of my posts to date, you can probably guess I went with option 1.

While the now-functional food processor did splash some egg around the inside of the lid, after a few seconds, the inside of the bowl went from this:


To this:


Hey, I warned you it would look gross.

Next, I had to knead the dough for 10 minutes until smooth. Here's where my lack of thorough melting came back to haunt me. As I was pressing down on the dough, I felt bumps that were scratching my hands a bit. I picked out one of the bumps and discovered it was a piece of a chocolate chip that hadn't melted. I removed as many of those pieces as I could from the dough as I was nervous that whole pieces of chocolate chips in boiling water might cause the pasta to seize or something. Yeah, so it's not the most rational worry, but it still couldn't be a good thing.

After kneading for some time, my dough looked much smoother, though no less disgusting.

I wrapped it up in plastic wrap and put it in the fridge while I made the second batch of the dough. The recipe doesn't require any resting, but since it was going to be a while until I rolled out the dough and cut it, I figured sticking it in the fridge couldn't hurt. In retrospect, leaving it on the counter would probably have been better, but I don't think it really made a difference in the end.

I cleaned out the food processor and started to combine the ingredients again, this time making sure that the blade was in place before I started pouring things into the bowl. Also, this time around, I made sure to add a few extra grams of chocolate before melting it to account for the bit that stuck to the microwaveable bowl and I couldn't scrape off. This time, when I ran the food processor, the end result was much smoother and easier to work with, and even seemed a bit shinier. I kneaded it as before, this time without any annoying chocolate chip pieces. I wrapped it up, then went to kill some time for a while before rolling out the pasta.

Now, here's where some insanity kicks in. I don't have a pasta roller, but I do have a rolling pin. I thought to myself, "Hey, I could roll this out by hand, right? It's just like rolling out cookie dough, but thinner." So I tore off a piece of parchment paper, floured it lightly, then dumped the first batch of dough onto the paper. I rolled it out a bit, then folded it over onto itself, then repeated the process a few times. Then I started rolling out the dough in earnest, but the parchment paper kept bunching up. Then, the dough kept sticking to my rolling pin. Finally, I had the bright idea to roll out the dough between two pieces of wax paper, which worked reasonably well. I put all of my weight onto the rolling pin as I rolled, trying to get the pasta to a thickness similar to fettucini. There was a lot of straining and grunting as I tried to press the dough down. At one point, it started to feel a lot like a strenuous workout, which sounds really lame, but hey: don't judge me. Much.

Eventually, I ended up with a lengthy sheet of dough that was about as thin as I was going to get. I'd put a picture here, but it looks like all my images are blurry, so you'll have to imagine it. It's just like rolled out chocolate cookie dough. I set a pot of water to boil while I began cutting the dough. I pulled out a knife and cut strips of the dough on the wax paper, peeled them off, and put them on a nearby piece of parchment paper. As I peeled the strips of pasta away, they left behind some pieces of dough, an unfortunate side effect of the wax paper. Halfway through, I gave up on the wax paper, and peeled the whole thing off to finish the cutting on the parchment paper. This way, I would have an easier time peeling the individual pieces. When all the cutting was done, here's what the pasta looked like:


Once the water started to boil, I dropped in the pasta and set the timer for three minutes. The water quickly turned a disturbing shade of brown, but that's what you get when you dump cocoa in water. The timer went off, I removed the pasta with a spoon, and put it into a colander to drain. I then went about repeating the entire process with the second batch of dough, this time transferring the rolled out dough to the parchment paper before cutting it, so I could get all the "sticking to the surface" mess out of the way at the start. 10 minutes later, I had a complete batch of chocolate pasta, which I lightly dusted with some powdered sugar.


I served the plate of pasta to friends of mine and asked for some feedback. The general consensus was that the chocolate flavor was subtle, and that it tasted more like pasta with some chocolate in there somewhere vs. intensely flavored chocolate. I tried some myself, and I was forced to agree. I had envisioned chocolate pasta as this really rich chocolate dessert dish that also functioned as pasta. The way it stands right now, it doesn't really function that way. I'm not sure it functions as a main course either, since the chocolate flavor is strong enough that I think it would clash with some of the more traditional pasta sauces.

I asked my friends for some ideas on how to make the chocolate flavor more pronounced or how to make the dish as a whole be better. One suggested adding salt to the water (nowhere during this entire process did I use any salt). Another suggested putting some coffee in there somewhere, either in the original dough or the water. One popular idea was adding a raspberry sauce, hoping the tartness of the raspberries would both accentuate the subtle sweetness in the pasta and overall blend well. I liked that idea the most and will probably try it the next time I make this pasta. I'm also open to other ideas; leave them in the comments below.

Overall, what was my takeaway? Mainly, eating this chocolate pasta as a standalone isn't so great. It needs something really pull it together. But at the end of the day, I was satisfied with what I produced. I just hope the next time it'll be even better.

Oh, and rolling out pasta by hand? It can be painful. But totally worth it.
-----------------------------------------------------------------------------
Chocolate Pasta (adapted from a recipe on "Instructables" which can be found here: Chocolate Pasta)

Remember that the chocolate flavor of this pasta is mild.
  • 1 cup of Plain Flour
  • 2 eggs, lightly beaten
  • 60g (2oz) Dark Chocolate
  • 2 Tbsp Cocoa
  • 1 Tbsp Icing (Powdered) sugar
1) Add all the ingredients into your food processor and process until mixture forms into a ball.

2) Turn onto a lightly floured surface and kneed for 10 minutes until smooth.

3) Split the dough in half and work with half at a time. Flatten pasta out with hands slightly and roll on widest setting in pasta machine. Fold over, and repeat, occasionally changing the rolling width. As it gets closer to the thickness you want, you can drop the folding over step. (If you don't have a pasta machine, you can roll this out with a rolling pin.)

4) Once the pasta reaches the desired width, cut the pasta into whatever shapes you want. (I made something like fettucini, but the original recipe used spaghetti. Then again, I was using a knife and the original writer had pasta cutters and a roller)

5) Bring a pot of water to a boil, then drop the pasta into the water. Cook for about three minutes, though the cooking time may vary with the thickness of your pasta. Remove the pasta from the water and drain.

6) Serve as is, or dusted with powdered sugar. You could also add a sauce to it, but I didn't make one and I don't have one to offer yet.

Wednesday, April 13, 2011

What I Learned From Carrot Cake


On Sunday, for reasons that I still don't know, I had the sudden urge to make a carrot cake from my America's Test Kitchen cookbook. I really can't explain it. I had a pound of carrots in my fridge that were originally earmarked for a stew or maybe some mirepoix. But no, they were going into a cake. Once I had the idea, I was committed. And in making the cake, I learned some things along the way, as you'll soon see.

The first step of making a carrot cake is grating the carrots. But I had one glaring problem. I didn't have a grater available. "But wait," I can hear you say, "what about a food processor?" Yeah, I don't have one of those either. So I had to figure out a way to get all my carrots (pictured below) into manageable pieces. Suddenly, it hit me. I could use a vegetable peeler! The end result wouldn't be as good, since the pieces would be larger than the "strands" produced by a grater, but it would work reasonably well. Right?

Well, there was only one way to find out. I started peeling my carrots. And peeled. And peeled. And started to get angry at my carrots. And then started to get angry with myself for stupidly trying to peel this many carrots. (As as you can see below, there were a lot of carrots.) I nearly peeled off a finger as carrots slipped from my hands. Eventually, I pulled out the cutting board and my knife and started to cut the carrots into pieces after once I couldn't peel them anymore. After what seemed like an eternity, not to mention very orange hands, I was able to get through all of the carrots.

The carrots before I cut them.
The carrots afterwards.

From there, I proceded to combine the dry goods in a bowl. I mixed my flour, baking powder, baking soda, cinnamon, nutmeg, salt, and cloves together. Here's where I made a bit of a mistake. The recipe calls for 1 teaspoon of baking soda and 1 1/4 teaspoon of baking powder. After portioning my flour, I accidentally put in 1 1/4 teaspoon of baking soda. I realized my mistake quickly, and tried to scoop out some of the baking soda with a 1/4 teaspoon measure. I don't think I was quite so successful, but I wasn't going to throw out the whole mix just because of it.

Next came the beginning of the batter. I put my eggs, brown sugar, and white sugar into my stand mixer and started it up. According to the recipe, the idea here was to whip air into the eggs to make it fluffier, which sounded fine in principle. I ran the mixer until it was creamy, then started to add oil. The intent was to make an emulsion of the oil and the egg/sugar mixture. Unfortunately, it didn't quite succeed. There was a ring of oil around the top of the batter, and no matter how long I ran the mixer, it wouldn't emulsify.

I resigned myself to my fate and started to incorporate the dry ingredients. The instructions said to do it in two batches and to whisk by hand. I started to do this, but quickly realized that the batter was getting thick and clumpy, making whisking difficult. I moved the batter back to the stand mixer, put on the whisk attachment, and kept it running. As I added the second half of the dry ingredients, the batter got drier and drier until it resembled more of a dough than a batter.

This led to an interesting time when I had to incorporate the carrots. The recipe says to "gently stir in the carrots." But the dough was so thick, there was nothing gentle about it. I had to push the carrots in forcefully with my spatula, hoping to make as even a mixture as possible. I thought adding in a little bit more oil might help loosen it, but it didn't help much. I was stuck with a clumpy, somewhat dry mixture that had carrots in there somewhere.

Then I had the challenge of putting the dough into pans. The recipe called for a 13 x 9 pan, which I didn't have around. I instead opted for 2 8x8 pans, attempting to divide the "batter" equally between them. This took quite a bit of effort as I had to scoop it out with my spatula instead of "pouring" it out as the recipe suggested. This resulted in the pans below.


I put them in the oven for 25 minutes, 10 minutes less than the original recipe called for. I wanted to make sure that the different pan sizes wouldn't result in an accidental overcooking. I rotated the pans a few times, reset the timer over and over, and after a total baking time of about 40 minutes, I pulled out the carrot cakes that you see at the top of this post.

I was supposed to wait two hours before removing the cakes from the pans, but I just couldn't wait. After an hour, I cut a piece of the cake and ate it. To my surprise, despite all the problems I had while making it, the cake tasted really good! The pieces of carrot were slightly larger than I would have liked, but it looked like the peeler did a reasonably good job. I ate about 1/5 of a pan of cake that night. I put the second cake into the freezer once it had cooled completely, and put the first cake into a Ziploc bag. I went to sleep that night thinking I had a success on my hands.

But this isn't the end of the story.

The next day, as I was eating my lunch, I grabbed a piece of my carrot cake to have for dessert. I bit into it, expecting to be rewarded with a sweet, carroty experience. What I got instead was an incredibly saccharine aftertaste in my mouth that I hadn't noticed the day before. Thinking it was maybe an isolated piece of the cake, I had another piece. The same aftertaste lingered in my mouth, and there was nothing I could do to get it out. My success had now fizzled into a food that left a bad taste in my mouth for hours.

I don' t know what caused the change in taste from Sunday to Monday. Maybe it had been there all along, but my desire for carrot cake on Sunday overrode it. Maybe the moisture in the Ziploc bag had caused the sugar to crystalize again. Maybe the slightly warm cake masked some of the intensity of the sugar. Or maybe it was supposed to taste that way, but without the cream cheese frosting that was supposed to accompany it, the sugariness couldn't be cut.

Whatever the reason, it taught me an important lesson, especially when applied to cooking large batches of things for myself: Before calling something a success, make sure it still tastes good the next day.

I tend to make large quantities of food because often, reducing the recipe is more hassle than it's worth. This usually results in me eating most of the food myself. I'm the only one in my apartment who can eat most of my baked goods because my roommate doesn't eat gluten. I can give friends of mine some of it, but not always. So if I'm going to have an entire cake to eat alone, it had better taste good for a couple of days after I make it. Otherwise, it's a bit of a waste.

Oh, and what did I do with the rest of the carrot cake? I ate it. Sure, it sometimes left a bad taste in my mouth, but I eventually dealt with that by over-spicing my dinner on Monday night. But that's a story for another time.

Sunday, April 3, 2011

Girl Scout Thin Mints, Take 1


There is one dessert flavor combination that ranks above all else: chocolate and mint. There's something about sharp mint flavor cutting through rich chocolate that hits just the right spot.

Chocolate minty goodness has held a special place in my heart for a long time. My favorite candy for a long time was York peppermint patties. When I went to the UK for a trip in '09, I brought back a ton of after-dinner mints because I thought they were the coolest thing ever. In college, I became renowned for my chocolate peppermint cake (a recipe I am sure will turn up on this blog in the future).

Of course, there is one product out there that strikes the perfect balance of flavor and texture. I am talking, of course, of the Girl Scout Thin Mints. They are the quintessential cookie for diehard chocolate-mint aficionados. Whenever the Scouts have their annual sale of cookies, boxes of thin mints are quickly seized by crazed fans of the delights, hoarding as many as they can until the next sale begins.

Seeking to avoid such…well, insanity, I decided to try my hand at making my own Girl Scout Thin Mints. It's a recipe that sat in my list of links for a long time, but it took a while to get my act together to actually make them. What finally did it?

Frankly, the opportunity to mock a friend of mine. One of my friends and followers on Twitter, @KatieHall, loves to talk about how many boxes of Girl Scout cookies she has in her house. Not one to let an chance to tease a friend slide, I told her that I would be making thin mints of my own to have any time I wanted. I vaguely recall describing how I'd be laughing at her as I devoured my own creations. Her response was…unimpressed to say the least. Undeterred, I started on my thin mints. Unfortunately, I made a number of mistakes in the process.

Mistakes number one and two involved creaming the butter and sugar. If you recall from my previous post, I try to avoid recipes that call for creaming because I lack a mixer I can use for dairy ingredients. But a thought occurred to me: Why not use the 2-cup capacity food processor I own? Since my recipe calls for 1/2 cup of butter and 1 cup of sugar, it should totally work, right?

No. It did not. A small food processor really doesn't want to throw sugar into butter at a high speed. What it does want to do is smoosh (yes, that is a technical term) the butter into a clump that may has a dusting of sugar on it, but leave the rest of the sugar lying on the bottom of the bowl. Not helping matters was the other mistake: the butter was way too soft. I had pulled it out of the fridge a good four hours before starting to process it. This meant that instead of a slightly softened stick, I had nearly melted mush. In an attempt to "save" the butter/sugar mix, I dumped it into a bowl and stirred it up with a whisk for a bit in an attempt to incorporate the sugar. I then mixed in the milk, vanilla extract, and (most importantly) the peppermint extract.

A word here about milk in general. I am not a big milk drinker. Some of it is because I'm lactose intolerant, so drinking milk is a bit of pain since I have to take a Lactaid caplet with it. The other part, and probably the more important one, is that I just don't like plain milk. The texture and taste are just not that appealing to me. So when I have recipes that call for milk, I try to use soy milk when possible. This helps me avoid buying large quantities of milk that eventually get thrown out when they're not used beyond the immediate recipe.

But this week, I discovered my local Trader Joe's carries shelf-stable milk (like Parmalat) in individual 8 ounce boxes. This was great because I could have some milk on hand and I wouldn't waste milk when cooking, So it was one of these cartons of milk that I ended up using for the recipe. OK, side note over.

Butter, sugar, milk, and extracts combined, I started to stir in the combined dry ingredients. Here's mistake number three: Not learning from the last cookie adventure, I continued to try using a whisk to incorporate the dry and wet ingredients. Predictably, this didn't work so well. I did eventually abandon the whisk in favor of a plastic spoon I found in the kitchen. This helped, but not before I had put a fair amount of strain on my wrist.

After some time, the dough looked really dry and crumbly. I wasn't sure if I should add more liquid, so I tried to test out the dough by attempting to pack the dough into a cohesive mass and see if it would stick. It did, so I chose to press forward anyway. This may be another mistake, but I don't know for sure, so I'm leaving it out of the count. I portioned out the dough, put half onto some plastic wrap, and tried to shape it into a log. This led to mistake number four: trying to roll it into log within the not-well-sealed plastic wrap. In my attempts to roll the dough into the appropriate shape, I managed to push the dough off the counter and onto the floor.

Sighing, I threw it into the garbage and focused on the remainder of the dough. I managed to work it into a rough approximation of a log and tossed into the freezer as directed. A few hours later, I pulled out the dough and began cut the dough into disks to be baked. Mistake number five: I used a serrated knife to do the cutting, and that dough was hard as a rock. I tried sawing at it for a while, but that didn't produce the disks I wanted. My knife kept slipping and small shavings of dough would come off. Eventually, I just pressed down on the top of the knife blade to push it through the dough. DO NOT DO THIS EVER. It is incredibly unsafe, and even if you avoid cutting your hands, it still really hurts.

The end result of all this hacking and slashing were a series of disks that ranged in thickness from 1/2 inch to 3/4 inch. In other words, I was no longer making thin mints. I was making "thin" mints.


Still, it was too late to turn back now. I tossed the disks into the oven on my brand-new baking sheet and anxiously waited to see what would happen. The recipe noted that the cookies would not spread that much, and I'm grateful that note was included. These cookies didn't spread at all, and without that note, it's quite likely I would have started to quietly freak out that I had done something wrong.

Once the cookies were done, I pulled them from the oven and let them cool on my brand-new cooling rack. Yes, I just got a new cooling rack. Yes, it's the first cooling rack I've ever owned. Yes, I should have gotten one a long time ago. Can we move on now?


As the cookies cooled, I tried one. It was a crispy wafer, and I was relieved to note that the texture was right. The chocolate and peppermint were certainly there, but they weren't very strong. I held out hope that maybe the muted flavor was because the cookie was still warm and overpowered the ability to pick up on the flavor. I really, really hoped that's what it was.

An hour later, I began the coating process by melting down some butter and Trader Joe's chocolate chips in a saucepan. Using two forks, I placed each cookie into the saucepan and coated it with chocolate. Then, I lifted the cookie out of the pan and onto a piece of parchment paper to cool. I haven't done chocolate coating often, and when I have, I tend to overcoat. This was no exception. But I like a lot of chocolate, so that wasn't so much a mistake as an….overindulgence.


Once the cookies were all coated, I put a piece of wax paper on top of them and put them in the fridge to hasten the hardening process. 30 minutes later, I was crunching into a homemade "thin" mint cookie.

The end product was certainly tasty. The mint and chocolate were both there and much more in the forefront. I was nervous that the shelf-stable milk would leave a chalky taste in the cookie, but it turned out to be a false concern. I gave some to friends of mine and they all considered it a rousing success with little to no complaints. The most common was the thickness of the cookie, which I readily copped to.

So do I consider the recipe a success? Sort of. It produced a cookie that I and many others enjoyed, so on a basic level: Yes, I was successful. But there's so much more I could do to improve the recipe. I need to find a better way to cut the cookie, for one. I want to increase the peppermint flavor, too. I debated adding some peppermint extract to the chocolate coating, but decided not to in the end. I wanted to try and make the "baseline" cookie before messing around too much with it. Now that I have the baseline, I have ideas about what to do.

Until I improve this recipe, I'm not going to post the recipe in full below. If you want to read the recipe that I used, here's a link to it: Homemade Thin Mints. And if you've got suggestions on how to overcome some of the mistakes I made, leave a comment below. I'm happy to try out new things to improve my process.