Showing posts with label projects. Show all posts

Monday, November 26, 2012

Replacing Milk in Baking


As a kosher baker, milk and butter are two of my biggest enemies. Most of my baking is for meals with meat, so I have to keep food dairy-free. This means I have to find substitutions without sacrificing flavor. I've already addressed butter in a previous post (Replacing Butter: Vegetable Oil) so I think it's time I tackled milk.

Most of the time, I (along with most other kosher bakers) use soy milk as my substitution of choice. But there's plenty of other options out there: almond milk, rice milk, oat milk, and even hemp milk are all relatively easy to find in supermarkets these days. Friends of mine swear by different products, each one praised to the heavens about how much better it is than soy milk. How can one person choose?

Well...by doing this.
The muffins in all their glory. Photo by Terri Ash
I baked four batches of muffins, with 12 muffins to a batch. Every batch was exactly the same, except for one ingredient: the milk. One had 1% milk, another used soy milk, another was rice milk, and the last was almond milk. I used oil instead of butter to make sure any "dairy flavor" could only be attributed to the milk. Here's a closer look at each muffin. Can you guess which is which? The answer is in the caption, so don't scroll down too far if you want to guess.
From left: Almond (green), rice (light blue), soy (dark blue), and 1% milk (red). 
Photo by Faigy Gilder
Just by looking at them, you can see there's a stark difference between the muffins. The soy milk muffin  has a higher dome, while the almond milk muffin looks...bumpy, for a lack of a better word. But how different do they taste?

I invited six friends of mine over to do a blind taste test. I told them about the different types of muffins and asked them to try some of each. After they tried all the variations, I asked them to guess which one had the real milk and to rank them from top to bottom. The results were very surprising:
  1. 2/3 of testers said the soy milk muffin was their favorite, with one tester going so far to say it was "the kind of muffin where you'd want to just eat the crown." (which I am taking as a good thing.)
  2. 2/3 of testers said the regular milk was their least favorite. Some described it as "dense" and "rubbery." 
  3. Only one person correctly guessed which muffin had milk. Half of the testers thought it was the rice milk. In fact, more than one person said "I can really taste the milk substitute" while eating the milk muffin. 
It's pretty clear by looking at these results that soy milk is the favored substitute. It should be noted, though, that almond milk was pretty close behind, with the same number of "points" as soy milk but with less first place votes. And if that's all you wanted to know by reading this post, feel free to stop here. But if you want to know why I think this was the result, keep going. 

I believe the reasons behind these results can be found in this table:

Nutrition Information per 1 cup of liquid
          1% milk Soy milk Almond milk Rice milk
Fat 2.5g 5g 2.5g 2.5g
Sugar 12g 7g 7g 10g
Protein 8g 11g 1g 0g

First, the soy milk has twice as much fat as any of the other options. As any good baker knows, more fat equals more flavor. Next, the sugar in rice milk is about the same as regular milk, which is probably why it was mistaken for real milk by many of the testers. 

As for why milk was so poorly received and had such a bad texture, I turned to science. Specifically, Harold McGee's On Food And Cooking: The Science and Lore of the Kitchen. There, he explains that a protein in whey can sometimes weaken the gluten structure of baked goods and produce denser products. Muffins by design have very loose gluten matrices that are only just strong enough to hold onto the gas produced by chemical leaveners. If the gluten matrix was sufficiently weakened by the milk, it wouldn't be able to trap the bubbles during baking, and you'd end up with a dense muffin.

So what can you take away from this experiment? If you have to replace milk in your baking, try soy milk. If you end up using something with less fat, add some additional fat to the batter to compensate. Also, keep an eye on the sugar content, as you might have to adjust it to meet expected tastes. 

And stop panicking about milk. Apparently, no one likes it anyway. 
A piece of milk muffin no one wanted after the tasting.
Photo by Terri Ash

Monday, May 23, 2011

The Creaming Method: Mixer vs. Spoon

If you've read some of my earlier posts, you'll know that I frequently lament my inability to use my electric mixer for dairy products. As a result of this limitation, I am unable to make any cookies that require the creaming method when mixing butter and sugar. I've managed to select recipes in the past that avoid this problem, such as the Chocolate Chip Cookies I made which uses melted butter instead.

But recently, I received two competing comments on posts about the creaming method. First, an anonymous commenter (later revealed to be my mother) wrote on my Girl Scout Thin Mints post: "I think it is time to get a mixer!" Then, another anonymous commenter (later revealed to be the mother of a friend of mine) wrote on my Molasses Spice Cookies post: "Wooden Spoon! One of the best implements used by bakers for generations. With a little elbow grease, it creams butter and sugar perfectly." So I had a challenge on my hands: Could a wooden spoon cream butter and sugar as well as an electric mixer? I decided to find out.

Before I began the baking, I did some research on the creaming method. This involved reading Shirley Corriher's Cookwise and watching a couple of episodes of Good Eats. Essentially, the creaming method combines fat (usually butter) and sugar together, usually at a quick speed. This has a few effects: First, it adds air to the butter/sugar mixture, resulting in a lighter final product. Second, the impact of the sugar slamming into the butter creates small pockets, which expand during baking, contributing an airy texture to the product as well. Finally, those same pockets allow other ingredients to become more evenly incorporated throughout the dough, so there aren't random pockets of concentrated ingredients.

Conventional wisdom has told me that only an electric mixer has the power and speed to cream butter and sugar effectively. Creaming by hand means that there is insufficient velocity to make the pockets in the fat that are essential to a good cookie. Therefore, the hypothesis of my experiment was this: Cookies that use an electric mixer for creaming are better than cookies creamed by hand. Now, because I was using the electric mixer for part of this experiment, I needed to use dairy-free margarine in my recipe. I found a recipe for a chocolate chip cookie that called for 1/2 cup of margarine, which was also helpful as 1/2 cup is the same as a stick, so I wouldn't need to do extra measuring.

First was the electric mixer method. To start, I pulled out a stick of margarine from the fridge and put it on a table to soften for 30 minutes. While I waited, I turned the oven on to 350 degrees. Then, I measured out my flour and baking soda. The recipe was written volumetrically, not by weight, so I wrote down the weight of everything so I could precisely duplicate the recipe when I switched to the other method. Therefore, the 1 1/8 cup of flour I used became 159 grams and the 1/2 teaspoon of baking soda became 3 grams. I didn't measure the "pinch of salt" because it was too small to measure by weight. In lieu of a sifter, I put the dry ingredients into a bowl and stirred them up with a whisk.

Once the 30 minutes were up, I put the stick of margarine into the bowl of my mixer. I poured out 1/4 cup of white sugar (45 grams) and 1/2 cup of packed brown sugar (96 grams) and put it in the bowl with the margarine. I stuck the paddle attachment on the mixer and let it run for a few minutes until the margarine/sugar mixture looked light and fluffy.

In a plastic cup, I combined the egg and the vanilla before pouring it into the mixing bowl. A minute later, I added the flour/baking soda/salt mixture in batches until everything was combined. Finally, I measured out a cup of my favorite chocolate chips (170 grams) and stirred it in. When everything came together, I started portioning the dough, where I made a mistake. The recipe calls for "heaping teaspoons" of dough, but I read it as "heaping tablespoons." Oops. But larger cookies aren't the worst thing in the world, right? As long as I was consistent, the experiment was still valid. Besides, I was weighing every dough blob to keep the cookies about the same size amongst themselves, so everything was good.

Nine 44-47 gram balls of dough later, I had my first batch of cookies in the oven. I rotated the sheet after five minutes, then checked on them again five minutes later. The centers of the cookies looked undercooked, but the edges were defined and somewhat set, so I pulled them out of the oven anyway. Once I had the parchment paper off the baking sheet and onto the cooling rack, I ran the sheet under cold water so the next batch wouldn't start cooking from the heat of the pan (as they did in the Chocolate Chip Cookies). I portioned out the remaining eight cookies, and repeated the baking process. When they were all out of the oven, I put them on the rack to cool. I separated the first half from the second to account for the slight difference in oven temperature between the two, which I expected would come up again later. You'll notice there's only 16 cookies below in the picture when I made 17. That's because I ate one. Sue me.

On the left, the first batch. On the right, the second.

Then it was time for the wooden spoon method. I repeated the starting steps from before (leaving the margarine out for 30 minutes; "sifting" together the flour, baking soda, and salt; measuring out the two types of sugar), taking care to keep the weight of everything the same from the electric mixer method. But once I was ready to cream the margarine/sugar by hand, I wasn't sure how to go about doing it. Put it all in a bowl and stir the spoon around as fast as possible? Stab the margarine with the spoon, roll it in the sugar, and stab it again?

Thankfully, The Joy Of Cooking came to my rescue. It describes a method for creaming by hand: "Mash the butter against the side of the bowl with a wooden spoon, using a rocking and sliding motion and keeping the butter in a limited area of the bowl...Scrape the mass together as necessary and repeat...until the butter is softened. Add the sugar gradually and work the butter and sugar together until the mixture is light in color and texture." Sounds easy enough.

I used the metal mixing bowl again to make sure that the bowl material wouldn't be a factor. I grabbed the wooden spoon and mashed away at that margarine like there was no tomorrow. Unfortunately, I had failed to take into account the fact that the metal mixing bowl was tall and narrow, so I didn't have a very good angle from which to attack the margarine. It became some sort of awkward grapple with the bowl and spoon that at one point resulted in using my left hand, although I'm a righty. After mashing the margarine around a bit, I dumped all the sugar in at once and kept mashing. Yes, I know that the instructions from Joy Of Cooking says to add it gradually, but I added the sugar all at once with the electric mixer so I did it here too. Finally, after what seemed like an eternity of mashing, sliding, and scraping I ended up with this:

Doesn't look too bad, right? In fact, here's a comparison picture between the two creamings:

Left: Electric mixer. Right: Wooden spoon.

The two look pretty similar, though the electric mixer method spread the margarine all around the bowl, while using the spoon kept it in one place. In fact, I thought that the wooden spoon version was lighter and fluffier. Again, as before, I mixed the vanilla and egg together then mixed it with the margarine/sugar using the spoon. Finally, I added the flour/baking soda/salt mixture and the chocolate chips and mixed it all together with the spoon. It did become apparent that the dough was somewhat stiff and not so easy to stir with a spoon, but I was dedicated to the method.

Once the dough was done, I made the cookies exactly the same way I did the first time: Nine cookies on the first sheet, eight cookies the second time, cooling the sheet down in between batches. These are the finished cookies:

First batch on the left, second on the right

And just for a visual comparison, here are the two different trays of cookies. As you can see, there's nothing visually that stands out as different between these two cookie versions.

Top: Electric mixer cookies. Bottom: Wooden spoon cookies.

Now that the baking was over, it was time for the taste testing. I got a hold of a bunch of friends and asked them to try out some cookies for me. I labeled the cookies "M" (for mixer) and "S" (for spoon), gave them one of each, and asked for some freeform comments.

Most of the comments on the M cookies were positive. Many noted that their cookie was "not too sweet" and was "light" or "airy." A few described it as "smooth." Two tasters noted that the margarine came through really strong, leaving a noticeable fat flavor in their mouths. On the other hand, the S cookies were not as well received. One taster described the texture as "mealy." A few tasters described different dominant flavors: ranging from vanilla to salt to just plain cookie dough. Also, the S cookies were described as denser than the M cookies. In the end, four of the tasters preferred the M cookies, two preferred the S cookies, and one really didn't care.

The flavor imbalance of the S cookies was not that surprising. Remember, creaming helps the remaining ingredients combine evenly throughout the dough because of the pockets in the fat. Without adequate creaming, ingredients will be concentrated in some cookies while nearly absent in others made from the same dough. Also, S cookies would be denser than their M counterparts because less air was beaten into the fat and sugar.

That's just the freeform comments. What about hard numbers? I asked everyone to rate the cookies on flavor and texture from one to five, where one was the worst and five was the best. The results? M cookies had an average taste score of 3.21 compared to S's average of 3.07. M cookies had an average texture score of 3.43 compared to S's average of 3.07. Clearly, the M cookies were the victors in this battle.

But just how significant was that victory? While everyone had a preferred cookie, no one thought that the other cookie was so bad they wouldn't eat it again. In fact, the remaining cookies went pretty quickly; I only had a few left by the end of the day. I think the takeaway is that an electric mixer makes much better cookies than using a wooden spoon, but the spoon can certainly make a serviceable cookie.

That being said, I think I'm going to end up springing for an electric mixer. Because I hold to the philosophy that if you're going to make something, you should make it the best way you can. And it's clear to me that the best way to make a cookie is with an electric mixer.

[Got any other experiments you'd be interested in reading about? I've got a few more lined up in the future, including: oil vs. melted butter, how to replace egg whites in recipes, and gluten free substitutes. But if you've got ideas, leave a comment below or send me an e-mail at abonetopick@gmail.com]

Monday, May 16, 2011

Chocolate Pasta: Take 1

Here's the problem with making chocolate pasta. It looks disgusting. Squid ink pasta, which I've seen on TV, is a really cool looking black pasta. That's what I thought chocolate pasta could look like. Unfortunately, chocolate is more brown than black, so almost every picture I'm going to put in this post will probably look...well, gross. But I promise it tasted good.

Why chocolate pasta? Last week, I completed my second-to-last semester of my Master's program. To kick off my temporary freedom, I thought I'd try my hand at chocolate pasta, a recipe that looked really awesome and totally bizarre. I can't remember when or how I came across the recipe, but once I read it, I knew it had to be done. The only question was a matter of time. Making the pasta isn't a labor intensive process, but when the heck was I going to eat an entire plate of chocolate pasta? Thankfully, a bunch of friends were coming to over to my place on Sunday for dinner, so it was the perfect time to try it out and get some feedback.

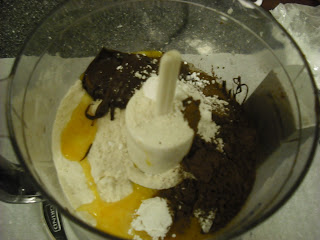
My friends planned to arrive around 7:15, so I began the process around 5:30 to allow time for rolling and cutting. The recipe uses a food processor to mix everything together, but mine only has a 2-cup capacity, and I was concerned about the processor overflowing. I decided to make the pasta in two batches, doing half the recipe in the processor at a time. I began by putting the flour, egg, cocoa, and powdered sugar into the processor. Then, I measured out the 30 grams of chocolate and put it in the microwave. 30 grams of chocolate is a lot smaller than I expected it to be. I melted the chocolate most of the way, stirred it around a bit, then spooned it into the processor. I closed the lid, pushed the button, and waited for the magic.

Except...nothing happened. I kept pressing the button, but nothing in the bowl moved. I heard a whirring sound each time, which led to further confusion. Finally, I realized I had completely forgotten to put the blade in the processor. This presented a bit of a dilemma. Should I: 1) try to squish the blade through everything and hope I don't make a huge mess; or 2) dump everything out of the bowl, put the blade inside, then put the ingredients back in. If you've read any of my posts to date, you can probably guess I went with option 1.

While the now-functional food processor did splash some egg around the inside of the lid, after a few seconds, the inside of the bowl went from this:


To this:


Hey, I warned you it would look gross.

Next, I had to knead the dough for 10 minutes until smooth. Here's where my lack of thorough melting came back to haunt me. As I was pressing down on the dough, I felt bumps that were scratching my hands a bit. I picked out one of the bumps and discovered it was a piece of a chocolate chip that hadn't melted. I removed as many of those pieces as I could from the dough as I was nervous that whole pieces of chocolate chips in boiling water might cause the pasta to seize or something. Yeah, so it's not the most rational worry, but it still couldn't be a good thing.

After kneading for some time, my dough looked much smoother, though no less disgusting.

I wrapped it up in plastic wrap and put it in the fridge while I made the second batch of the dough. The recipe doesn't require any resting, but since it was going to be a while until I rolled out the dough and cut it, I figured sticking it in the fridge couldn't hurt. In retrospect, leaving it on the counter would probably have been better, but I don't think it really made a difference in the end.

I cleaned out the food processor and started to combine the ingredients again, this time making sure that the blade was in place before I started pouring things into the bowl. Also, this time around, I made sure to add a few extra grams of chocolate before melting it to account for the bit that stuck to the microwaveable bowl and I couldn't scrape off. This time, when I ran the food processor, the end result was much smoother and easier to work with, and even seemed a bit shinier. I kneaded it as before, this time without any annoying chocolate chip pieces. I wrapped it up, then went to kill some time for a while before rolling out the pasta.

Now, here's where some insanity kicks in. I don't have a pasta roller, but I do have a rolling pin. I thought to myself, "Hey, I could roll this out by hand, right? It's just like rolling out cookie dough, but thinner." So I tore off a piece of parchment paper, floured it lightly, then dumped the first batch of dough onto the paper. I rolled it out a bit, then folded it over onto itself, then repeated the process a few times. Then I started rolling out the dough in earnest, but the parchment paper kept bunching up. Then, the dough kept sticking to my rolling pin. Finally, I had the bright idea to roll out the dough between two pieces of wax paper, which worked reasonably well. I put all of my weight onto the rolling pin as I rolled, trying to get the pasta to a thickness similar to fettucini. There was a lot of straining and grunting as I tried to press the dough down. At one point, it started to feel a lot like a strenuous workout, which sounds really lame, but hey: don't judge me. Much.

Eventually, I ended up with a lengthy sheet of dough that was about as thin as I was going to get. I'd put a picture here, but it looks like all my images are blurry, so you'll have to imagine it. It's just like rolled out chocolate cookie dough. I set a pot of water to boil while I began cutting the dough. I pulled out a knife and cut strips of the dough on the wax paper, peeled them off, and put them on a nearby piece of parchment paper. As I peeled the strips of pasta away, they left behind some pieces of dough, an unfortunate side effect of the wax paper. Halfway through, I gave up on the wax paper, and peeled the whole thing off to finish the cutting on the parchment paper. This way, I would have an easier time peeling the individual pieces. When all the cutting was done, here's what the pasta looked like:


Once the water started to boil, I dropped in the pasta and set the timer for three minutes. The water quickly turned a disturbing shade of brown, but that's what you get when you dump cocoa in water. The timer went off, I removed the pasta with a spoon, and put it into a colander to drain. I then went about repeating the entire process with the second batch of dough, this time transferring the rolled out dough to the parchment paper before cutting it, so I could get all the "sticking to the surface" mess out of the way at the start. 10 minutes later, I had a complete batch of chocolate pasta, which I lightly dusted with some powdered sugar.


I served the plate of pasta to friends of mine and asked for some feedback. The general consensus was that the chocolate flavor was subtle, and that it tasted more like pasta with some chocolate in there somewhere vs. intensely flavored chocolate. I tried some myself, and I was forced to agree. I had envisioned chocolate pasta as this really rich chocolate dessert dish that also functioned as pasta. The way it stands right now, it doesn't really function that way. I'm not sure it functions as a main course either, since the chocolate flavor is strong enough that I think it would clash with some of the more traditional pasta sauces.

I asked my friends for some ideas on how to make the chocolate flavor more pronounced or how to make the dish as a whole be better. One suggested adding salt to the water (nowhere during this entire process did I use any salt). Another suggested putting some coffee in there somewhere, either in the original dough or the water. One popular idea was adding a raspberry sauce, hoping the tartness of the raspberries would both accentuate the subtle sweetness in the pasta and overall blend well. I liked that idea the most and will probably try it the next time I make this pasta. I'm also open to other ideas; leave them in the comments below.

Overall, what was my takeaway? Mainly, eating this chocolate pasta as a standalone isn't so great. It needs something really pull it together. But at the end of the day, I was satisfied with what I produced. I just hope the next time it'll be even better.

Oh, and rolling out pasta by hand? It can be painful. But totally worth it.
-----------------------------------------------------------------------------
Chocolate Pasta (adapted from a recipe on "Instructables" which can be found here: Chocolate Pasta)

Remember that the chocolate flavor of this pasta is mild.
  • 1 cup of Plain Flour
  • 2 eggs, lightly beaten
  • 60g (2oz) Dark Chocolate
  • 2 Tbsp Cocoa
  • 1 Tbsp Icing (Powdered) sugar
1) Add all the ingredients into your food processor and process until mixture forms into a ball.

2) Turn onto a lightly floured surface and kneed for 10 minutes until smooth.

3) Split the dough in half and work with half at a time. Flatten pasta out with hands slightly and roll on widest setting in pasta machine. Fold over, and repeat, occasionally changing the rolling width. As it gets closer to the thickness you want, you can drop the folding over step. (If you don't have a pasta machine, you can roll this out with a rolling pin.)

4) Once the pasta reaches the desired width, cut the pasta into whatever shapes you want. (I made something like fettucini, but the original recipe used spaghetti. Then again, I was using a knife and the original writer had pasta cutters and a roller)

5) Bring a pot of water to a boil, then drop the pasta into the water. Cook for about three minutes, though the cooking time may vary with the thickness of your pasta. Remove the pasta from the water and drain.

6) Serve as is, or dusted with powdered sugar. You could also add a sauce to it, but I didn't make one and I don't have one to offer yet.